
TXT-1 Construction: Part 1
Jeffrey Zweizig Jeff Zweizig Jeffrey Zweizig Jeff Zweizig
|
Transmission, Motor and Frame Assembly Here begins the construction of my Tamiya TXT-1. Total build time was about ten hours although I only spent about one or two hours per night over the course of about a week. I ordered my TXT-1 along with all the accessories from Tower Hobbies. Look at all this stuff! Let's get started... 

The TXT-1 kit comes with a combination of ball bearings and bushings. I decided to build my TXT-1 using 100% ball bearings. To replace all the bushings, you'll need to purchase the following additional ball bearings: 
More supplies: I bought a Novak Super Rooster ESC to replace the MSC that comes with the TXT-1 kit. There's also a Novak Brake Light Kit (more on the Brake Light Kit in the 
First thing I did was grab some cups and organize my parts bags. There are a lot of small pieces to lose. Here's the transmission before final assembly. Bench testing the motors and transmission. 
I rewired the motors and added the requisite capacitors. Each motor requires three capacitors for a total of six. However, the Super Rooster only came with three. I purchased the extra capacitors at Radio Shack. But they turned out to be fragile and junky. I recommend buying extra Novak Capacitors. Eventually I'll add a Deans plug to interface with the Super Rooster. 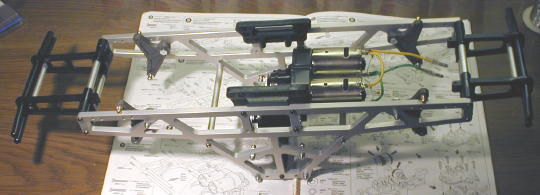
Then I assembled the frame and installed the transmission assembly. I was flipping out for a few moments because I couldn't find any of the F parts trees. Turns out they were packaged in a "secret" compartment under the wheels. I thought the cantilevers are a little too wobbly. I used ball bearings instead of the bushings. It seems to me that the spacer between the cantilevers and the frame isn't quite thick enough. Maybe I could pick up some shims if it turns out to be a big problem. Edit: turned out not to be a problem. 

Here I decided to rewire the motors (again). I used heavier wire and all wires connecting the motors with the Deans plug are of equal length. TXT-1 Construction: Part 2 |